Hello to those reading this, and welcome to my blog. This is a space for me to write about things that interest me, from science and technology to art like film and music. Today, I’m introducing how my blog was built and why I chose the technologies and tools that I did.
Previous iterations of my website have used the widely available blogging platform Ghost. Ghost is a powerful and dynamic blogging platform with an extensive range of features and a friendly interface, built on NodeJS, amongst other things. I chose the platform at the time after reading the blogs of Scott Helme and Troy Hunt, who both make extensive use of the platform and write content around it. However, much of the content they have written recently has been about getting around features that Ghost lacks. One such feature is support for proper HTTP security headers like Content Security Policy (CSP), a much-requested feature of cyber security professionals. Over time it became clear to me that Ghost has apparent deficiencies that you had to workaround.
In addition to this, I found that I was reticent to put in the effort to maintain the virtual private server (VPS) I was using the host the site to get around the minimum $9 USD per month I would have had to pay for a managed version of the platform. A managed platform is excellent for decreasing the amount of maintenance required, as I have learnt from my involvement in Chips and Cheese, where we use managed WordPress. However, the cost can often be unreasonable for individuals who want the most value from their money possible. As an example, hosting on the VPS versus a managed platform allowed me to create my own screenshot upload service using ShareX and an open-source project called ShareS. Having the ability to host this on my existing VPS saved me another $5-10 USD per month versus a pre-existing service such as Gyazo.
Over time as I have grown busier with both working and socialising, I have been unable to keep up with updating the services I have hosted on my VPS. As a result, I started recently investigating solutions to reduce my maintenance burden and lower my monthly costs. At the same time, I also wanted to achieve a similar or better level of service than the previous iteration.
An obvious solution would be to use a free blogging platform such as Medium or GitHub Pages. Still, I felt that I wanted a more significant amount of control over the solution I used. Whilst GitHub Pages offers me total control of the design of my site, I would have to use Jekyll to create it and would have no control over the server-side of the website. These solutions also leave me with no replacement for my screenshot upload service. This led me to realise I would need to find something flexible enough to fulfil the needs of both my projects.
One thing that has not changed about my personal websites and those that I manage for others is the use of Cloudflare for DNS, CDN and many other tools. The features it offers within the free package have been invaluable in helping get my projects off the ground, making it a favourite of mine for many years.
Over the last couple of years, I have been tracking the features they have been adding to their edge compute (or serverless) platform called Cloudflare Workers. Workers started as a function as a service (FaaS) platform competing with AWS Lambda and its competitor’s equivalents. Still, they had the distinct advantage of having a much wider network footprint and lower costs. However, it was limited to only running JavaScript, which is a language I did not know nor care to learn (yet). More recently, several new products have emerged from Cloudflare based on the Workers platform, the most interesting of which is Cloudflare Pages.
Cloudflare Pages is highly similar to GitHub Pages, offering to host a static site at no cost using a Git-backed repository. This repository stores source code and tracks changes, making it easy to maintain a website over an extended period. However, whilst both have this similar base structure, they differ significantly as Cloudflare Pages can be used to host almost any static site that you might wish for, removing this limitation that GitHub Pages presents. This made it an ideal candidate for my new blogging platform, as it allowed me to use any number of available open-source solutions or even build my own. I was already using Cloudflare Pages to host the JavaScript-based memory latency test and the associated data site for Chips and Cheese, so using it for my own website was a natural next step in the progression.
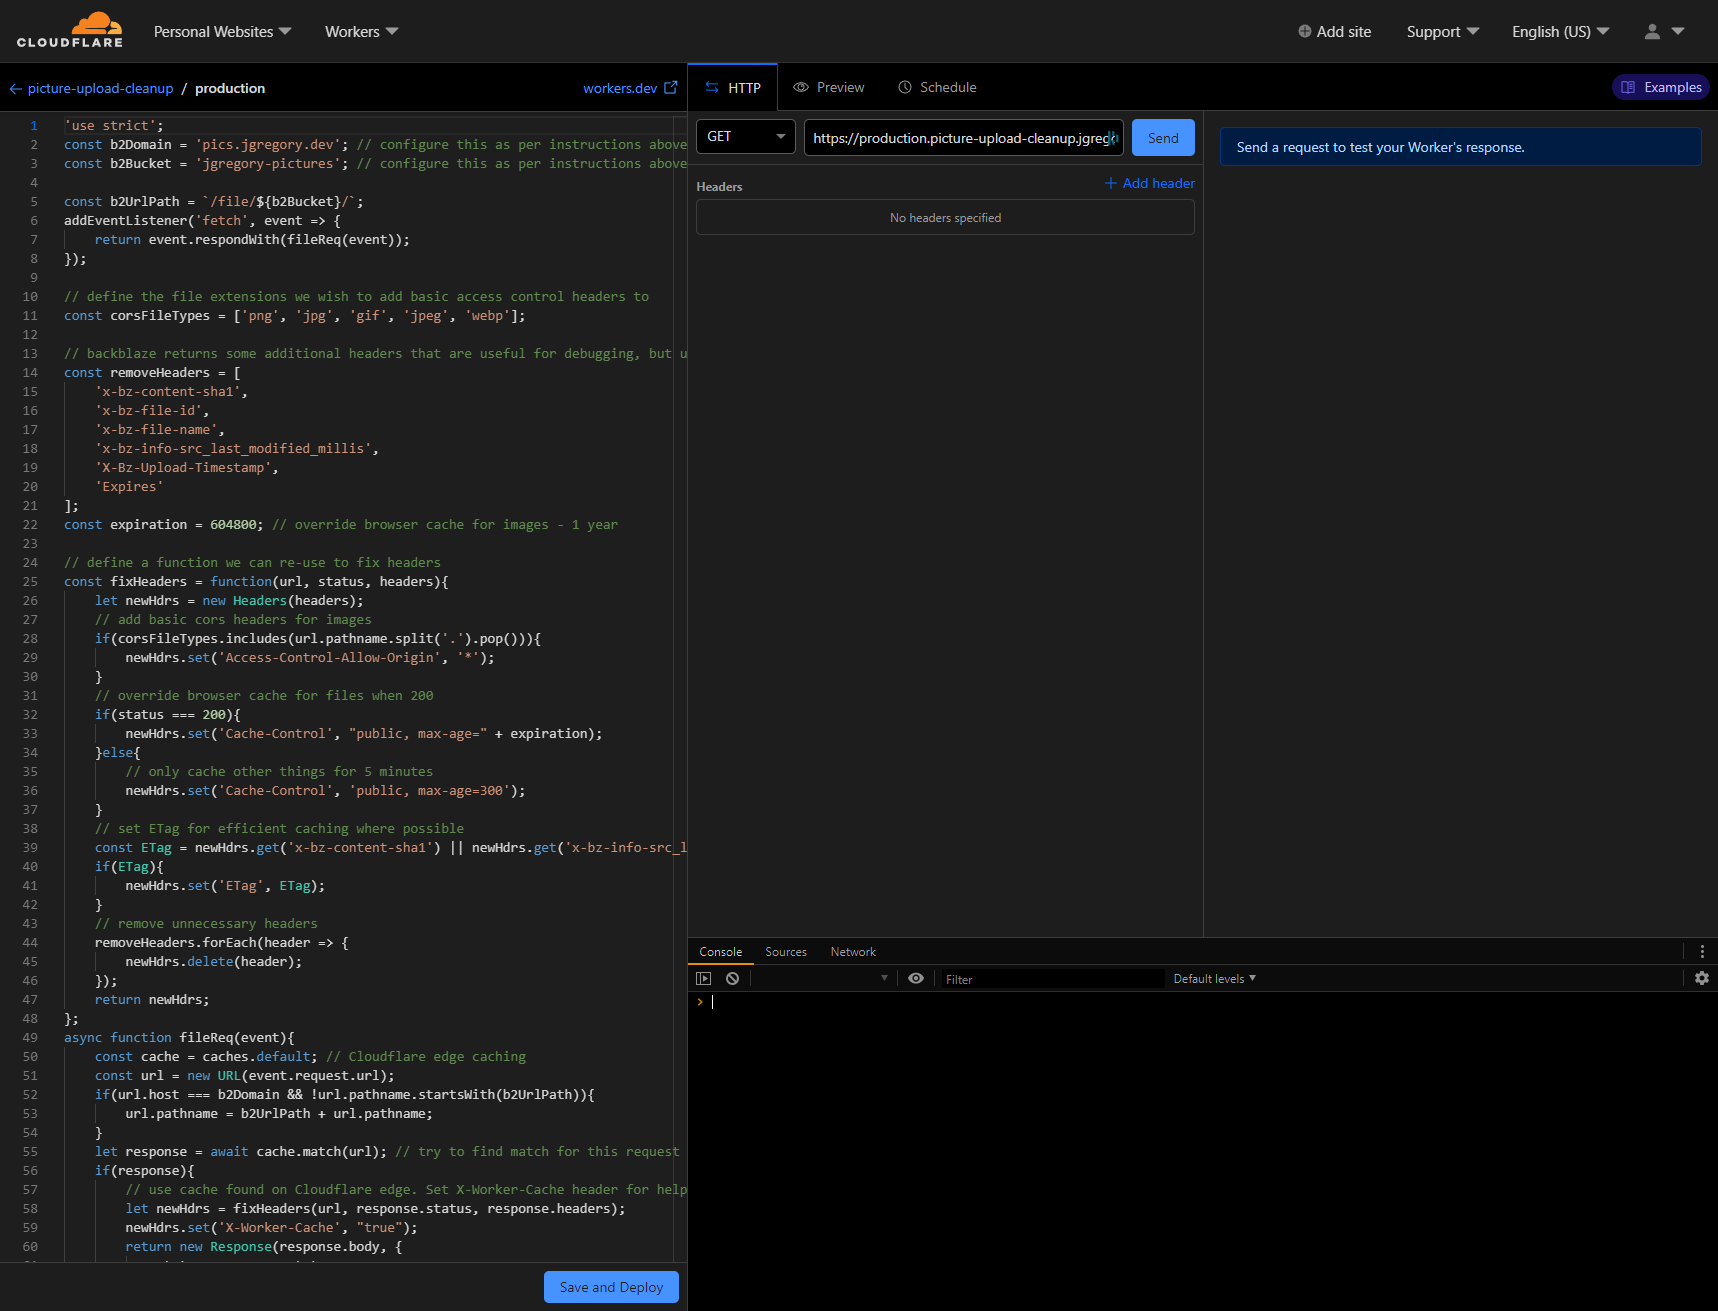
In parallel, I also investigated using Cloudflare Workers for my screenshot upload service, which led me to this excellent blog post by James Ross. It explains how he used Cloudflare Workers and Backblaze B2 to create his own extremely low-cost solution that functions almost identically to my previous solution. This new solution is powering my new screenshot upload service at https://pics.jgregory.dev and is now also serving my old screenshots that were previously hosted at https://share.jgregory.dev.
Once I had decided on my platform and gotten my screenshot upload service migrated, I needed to pick the static site system that I would use for my new website. Whilst an option was to code the site myself, I do not yet have the experience and expertise needed to craft a website that would satisfy me, so I needed to find something that already existed. Enter a series of blog posts from Cloudflare Director of Product Sam Rhea (found here), which provided me with some insight into how he had moved his own WordPress blog to Cloudflare Workers.
Sam makes use of Hugo, a Go-based static site generator, when building his website. After some initial exploration of other static site generators, I opted to use Hugo as well. I have found Hugo to be a potent tool, with its feature set being ideal for what I wanted to do with my blog after some initial teething issues. I make use of a pre-made theme from Jimmy Cai called Stack, which I selected for its modern look and consistent support. I had my new website up and running with minor changes within about an hour with my code hosted in a private GitHub repository.
In his tutorial, Sam used the Cloudflare Workers CLI tool Wrangler to create and upload his site to the platform, as this was the only solution available at the time. Since Sam’s tutorial was published, Cloudflare released the previously mentioned Pages platform, which removes a lot of the steps by completely absolving me of the need to use Wrangler at all. I have found Pages to be a fantastic platform for hosting my content and plan to continue using it for many years. Recent announcements from Cloudflare indicate that the platform will continue to evolve alongside Workers, and I look forward to using it.
I hope that you have enjoyed reading my first blog post if you have reached this point. I plan to release a new post at least once per month with some potential upcoming topics, including the ransomware epidemic and my experience of Dune in both film and writing.
If you wish to comment or contact me, please do so via my LinkedIn page where I will be posting this as a public post, or via an email using this link. In addition, if you have any suggestions for future content, please get in touch via the same means. Finally, I would also urge you to look at some of the in-depth technical content from my colleagues at Chips and Cheese, including our deep dive into Arm’s Neoverse N1 cores.